I am a scientist who loves to cook because there are many similarities between working in a lab and cooking in a kitchen. I love to share my cooking experience with you and to inspire others to cook.

Monday, July 9, 2012

Roasted Pork Belly


Sometimes there is no words to describe how delicious roasted pork belly taste. The 4 key things that I look for in a perfect roasted pork belly are these:

1) crispy pork skin
2) not too much fat layer under the skin
3) tender and juicy meat
4) just the right amount of salt

Call me picky (aren't we all picky when comes to certain things?), I yet to find a place that sells roasted pork belly that meets every single requirement that I look for.

As for the solution? Make it my own!

I found a recipe on this website http://www.noobcook.com/crispy-roast-pork-belly/  , which I based my "experiment" on. 


Ingredients
1 slab of pork belly (approximately 1.5lb)
2 tsp of salt
1/2 tbsp 5-spice powder
1/4 tbsp white pepper powder

Instructions  (the words in red are copied verbatim from the website above, please refer to the site for complete original instructions)

1. Holding a small knife in a stabbing action, make short diagonal slits with the tip of the knife on the surface of the skin (but not cutting into the meat) at random. 

2. Combine 1 tsp salt, 5-spice powder and white pepper in a small bowl. Rub the marinade all over the meat portion only. If any marinade gets on the skin, rub it off with a paper towel.


3. Rub the remaining 1 tsp salt on the skin. Place pork belly on a plate, uncovered, skin side up and let it marinade for a few hours or preferably overnight in the refrigerator. The purpose is to dry the skin thoroughly.  I did it overnight. 

4. Place the pork belly skin side up on a baking tray. There are many ways to roast a piece of meat. The key is to reduce the amount of oil splashes in the oven. Please find other resources on the internet on how to deal with this.
 

5. Set the oven to 400F and let it come to temperature.

6. Roast the pork belly for 1 hour or until you can stick a bamboo skewer through the meat. 


I am not shy to say that this roasted pork belly hit every single thing that I look for in the "perfect" roasted pork belly. The skin of this roasted pork belly isn't as crunchy as I am accustomed to but it is a minor flaw that I will accept without burning the meat in the process.

I lied when I said I used pork belly, be honest, I actually did not use the traditional pork belly cut. Instead I used something leaner as you can see from the photo. I don't remember the name of the cut but I will update it when I find it.

In my opinion, this is a very simple dish to make and it sure tasted better than any store-bought roasted pork belly within my vicinity.


My roasted pork belly has a big gaping hole staring at me. Now it makes sense why the author of the website that I used has this line:


By this time, the skin will be softened and you can see some blistering on the skin. Using a bamboo skewer, poke as many holes as you can on the portion of the skin which is still soft.


Monday, June 18, 2012

French Onion Soup


Every dish and every food that I cook has a story. There is a journey where you can trace the beginning, the failure, and the success. French onion soup has its own story too in my life.

I made this dish back in college. A group of us guys came together and created a meal for a few girls on Valentine's day. We guys are the chefs, the bus boys, and the servers. None of us was sophisticated enough to be a sommelier or a maitre'd.

French onion soup was on the menu and I was in charged of it. That's the beginning. Fast forward, I made French Onion soup again two weeks ago, which turned into a disaster. That's the failure. I learned a few lessons along the road and redeemed myself with the 3rd try. That's the success story.

So what have I learned from the failure? Three things:
1) Homemade beef stock is a must. No shortcut, no store-bought beef stock. Plain and simple. If you want a good french onion soup, make the beef stock from scratch.

2) Purist might disagree with me but forget about sautéing the onion until it turns brown. First, it will take you at least 40 minutes of constant attention. Second, chances of burnt onion is high. Instead - roast onion!! Read on.

3) Cheese, lots of it if you want the nice melty cheese on the soup.


Ingredients  (serves 4-5)

Soup (Adapted and modified based on Julia Child's recipe)

1) 2 lbs of beef bones. They sell it really cheap in the grocery store.
2) 4 medium size onions. Roughly sliced/chopped.
3) Chunks of beef (those that are used for stewing). Optional.
4) Small piece of dried bay leave
5) Pinch of ground sage
6) Small chunk of butter (Optional)
7) Worcestershire sauce
8) Salt and Pepper for tasting

"Garnish" (There must be another word for this)
1) Cheese (at least 1 lb?). You can slice it or cut it into cubes. There is no need to grate it. I bought Swiss, some recipes suggested Gruyere (someone please teach me how to pronounce this)
2) White bread. Purist please don't knock me for not using a baguette.

Instructions
1) To start, roast the bones and the onions at 450F for 30 minutes. I described this technique in my Oxtail soup recipe. http://foodmolecule.blogspot.com/2012/03/oxtail-soup.html
2) Transfer the roasted bones and onion into a soup pot and add just enough water to cover the bones.
3) Add the bay leave and ground sage into the pot
4) Cook the soup in medium heat for 2 hours (estimate). I used a pressure cooker which took me 40 minutes.
5) Seasoned the soup with salt, pepper, worcestershire sauce, and butter (optional).
6) Transfer the soup into a small serving bowl.
7) Put a piece of bread, which is cut to the same size as the bowl, on top of the soup.
8) Put the sliced/cut cheese over the bread.
9) Melt the cheese in an oven OR microwave. (read until the end).


The difference between this soup and the soup that was made using store-bought beef stock was day vs. night, mud puddle vs. the great ocean, dirt mound vs. Himalaya, ( I ran out of superlatives). First of all, this soup tasted FRESH and CLEAN. Second, the fragrant of onion was TRANSPARENT. My mind was clear and unclouded from the first to the last spoon. I tasted beef and I tasted onion. SIMPLE.

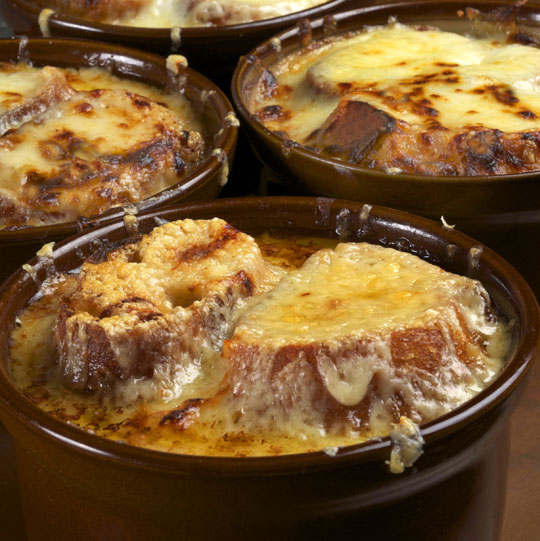
Now here comes the disaster part of this story. Professional cooks melt the cheese under a broiler to get this effect:

                            (From http://ruhlman.com/2011/10/french-onion-soup-recipe/)

They never tell you how long to do this so I waited and waited for the cheese to turn brown, then I found this in my oven:


That's a shattered (actually it exploded before my eyes) pyrex dish that I laid the ramekins on. In vehicular term - it is "totaled".

Next time, I will use a modern technology called a microwave. Yeah, I won't get the browned cheese, but I will not have "totaled" dish either.


Tuesday, June 12, 2012

Dumplings

An angel visited me two months ago and left me with 30 frozen dumplings. This post is a tribute to her gentleness, patience, and enduring love and sacrifice. You inspire me to cook and to live a life worthy of living.


Let me know if you want to host a dumpling party!

Saturday, May 26, 2012

Brownies


Anyone who does not like brownies please raise your hand. Perhaps you don't like chocolate, which is a fair reason for not liking brownies. But if you don't like brownies because it does not taste good or the brownies you had before were too sweet, then please allow this recipe to change your mind. 

David Lebovitz (http://www.davidlebovitz.com/) is my first-stop go to person for dessert recipe. He wrote a wonderful book called "The sweet life of Paris". If you were in Paris, or going to Paris, or dreaming about going to Paris, please read this book. 

I found David's recipe through another random website called http://leitesculinaria.com/36645/recipes-brownies.html  

I am going to copy the recipe verbatim from that website (reference and acknowledgement noted). I will simply highlight my own thoughts in RED.

Active time: 15 minutes | Total time: 30 minutes

Robert’s Absolute Best Brownies Recipe

Ingredients (serves about 12 people)

  • 6 tablespoons (3 ounces) unsalted or salted butter, cut into pieces, plus more for the pan
  • 8 ounces bittersweet or semisweet chocolate, chopped. 

  •                                  No, Lindt did not sponsor my website and I do not endorse Lindt. 

  • 3/4 cup sugar
  • 1 teaspoon vanilla extract
  • 2 large eggs, at room temperature
  • 1/4 cup all-purpose flour
  • 1 cup walnuts, almonds, hazelnuts, or pecans, toasted and coarsely chopped

Directions

  • 1. Preheat the oven to 350°F (175°C).
  • 2. Line the inside of an 8-inch square pan with 2 lengths of foil, positioning the sheets perpendicular to each other and allowing the excess to extend beyond the edges of the pan, or with a single large sheet of extra wide foil or parchment paper. Lightly butter the foil or parchment. [Editor's Note: The original recipe calls for a 9-inch square pan, although we've had success with an 8-inch pan.}
  • 3. In a medium saucepan over low heat, melt the butter. Add the chocolate and stir by hand until it is melted and smooth.
  • (I used a water bath technique which I talked about before, by warming the butter and chocolate with steam)

  •                           I always like the lava appearance of melted chocolate

  • 4. Remove the pan from the heat and stir in the sugar and vanilla until combined. Beat in the eggs by hand, 1 at a time. Add the flour and stir energetically for 1 full minute—time yourself—until the batter loses its graininess, becomes smooth and glossy, and pulls away a bit from the sides of the saucepan. [Editor's Note: There are two crucial elements in the making of these brownies. One is throwing yourself into the making of them by stirring them "energetically," as the recipe stipulates. The second, also spelled out in the recipe, is making certain you stir the batter thusly for a full minute. It may appear to separate a few seconds into stirring, and it may appear grainy midway through, but when you stir with vigor for a full 60 seconds--and we do mean a full 60 seconds, along the lines of "One Mississippi, two Mississippi..."--you'll end up with a batter that's rich, thick, satiny smooth, and glossy as can be. And therein lies the difference between dry, crumbly brownies and what many brownie mavens around the world feel are, indeed, the world's best brownies.] Stir in the chopped nuts.
  • (To summarize: After adding the flour, stir the mixture until your hand falls off. Switch hand and swirl until that hand falls off too. Good arm exercise)


  • 5. Scrape the batter into the prepared pan and bake until the center feels almost set, about 30 minutes. Do not overbake.
  • (I baked mine at exactly 350F for exactly 30 minutes. Perfect)
  • 6. Let the brownie cool completely in the pan—this is the difficult part—before lifting the foil or parchment and the block of brownie out of the pan. Cut the brownie into squares. (The brownies will keep well for up to 4 days and can be frozen for up to 1 month.)


  • If you look carefully, you will see four layers. Top is the crispy crust, the middle "fudgy" layer is sandwiched by the "cakey" layer. I dare say that this brownie is perfect although I would prefer it 10% less sweet but my tasters find the sweetness just fine. I am at lost of words to describe my joy when I take a bite into this brownie. It is absolutely delicious (for lack of better words).

    Tuesday, May 8, 2012

    Kaya


    Move aside nutella; get behind me, peanut butter; make way, strawberry jam and your entourage of fruit jams. Butter, stick around (pun intended). Here comes the new kid on the blog --- Kaya.

    What's a Kaya? According to Wikipedia, there are more than 20 definitions. The most interesting one being "Marijuana" in Jamaican. Surely I am not talking about that kind of Kaya.

    I am talking about the other Kaya that is translated to "RICH" and, boy, this a rich food item that everyone from poor to rich enjoys. It is a regionally confined food item that hasn't been spread around the world. The reason is simple - "Freshly Made". You can buy them at a grocery store in Chinatown but they are always a little off or too sweet.

    So what's Kaya? It is a Jam that you put on a toast.

    There are only three ingredients. Count with me. 1, 2......3.

    3 ingredients come together to form what I called "Golden Nectar" (I should trademark this).

    What are these ingredients?

    Eggs, Coconut Cream/Milk, and Sugar.


    Ingredients
    (make one cup of kaya, recipe courtesy of Pat, http://chewsome.wordpress.com/)


    5 whole eggs
    1/2 cup of sugar
    1 can of coconut cream

    Instructions:
    1. Warm up the coconut milk while it is still in its can. Set aside.
    2. Beat the eggs until very smooth.
    3. Add the sugar and continue beating. Make sure there is no sugar lumps.


    Should've beat the egg until smooth before adding the sugar. Don't be scared by the amount of  sugar


    4. Boil a pot of water. When the water starts boiling, turn the heat down to a gentle simmer.
    5. Set up a steaming mechanism as showed in the photograph. You can be creative with your own methods.
    (The key in making a good kaya is to avoid cooking the egg in direct heat. Instead, you want to use the steam as heat source. The top layer of the water should be at least 2 inches bellow the top pan.)


    6. Transfer the egg and sugar mixture to the pan and keep stirring gently.
    7. When the sugar has melted, add the coconut cream a few tablespoons at a time.
    (Add enough coconut cream until it reaches your desired flavor. I added about 3/4 of a can of the coconut cream).


    8. Don't forget to keep stirring the whole time.
    9. Keep cooking until the volume of the mixture has reduced significantly and the kaya begins to stick to the spoon.


    10. Store immediately in the refrigerator.
    11. In fact, go toast a piece of bread and spread it with warm kaya now!


    If you haven't had Kaya before, please bug me until you have tried this "Golden Nectar". I was lucky enough to have multiple food tasters and one recurring feedback that I hear was that "it taste like butter".  I very really thought of it that way but I do see the odd resemblance in taste. What I really like about homemade kaya is that I can control the sweetness. I really don't like food that is over-sweetened and making my own kaya makes sure it does not happen.


    Monday, April 23, 2012

    Cantaluope with Translucent Sago and Fragrant Coconut Syrup


    This is one of my favorite desserts of all time. No surprise, it involves coconut milk. It is a refreshing yet rich dessert that is commonly consumed as a drink. A certain restaurant in New York City has perfected this dessert in an item on their menu called "Frozen Banana Tapioca" and I have been determine to revisit my childhood memory and to recreate that dish with my own interpretation.

    Ingredients
    Cantaloupe/Honey Dew/Papaya - 1 small fruit is more than enough
    A bag of sago
    Sugar (for making the syrup)
    1 can of coconut cream

    Each of the ingredient in this dessert needs to be prepared separately for assembly later.

    Instructions

    Preparation
    A) Fruits  - cut into small pieces and refrigerate
    B) Sago - cook until translucent.
    C) Syrup - Boil approximately 2-3 cups of water. Add sugar until the syrup attains your preferred sweetness. Chill the syrup in the refrigerator.


    Assembly
    1) Mix coconut cream with the syrup. I would start with a 1:1 ratio of coconut cream and syrup. There is a lot of freedom on how you much of each to use. It all depends on your taste and preference.
    2) Lay the fruits at the bottom of a bowl, add the sago over the top and drizzle the coconut syrup.


    It is that simple, isnt it?

    Fresh fruit, the fragrance of coconut, the sweetness of the syrup and the soft texture of Sago. It dun't get any better than this. You can definitely use other fruits such as honeydew, papaya, watermelon, all kinds of berries and even banana.


    Sunday, April 15, 2012

    Braised Pork Belly with Preserved Vegetable


    This is one of those dishes that I categorized under the title "Classic Mom's dishes".  I would ask my mom to make this dish whenever I get the opportunity, which is rare. I am a blessed with a mother who cooks really well and extremely blessed to have my mother sojourning at my place for a short term.

    We finally made it to Chinatown to buy the necessary ingredients to make this dish:

    Braised Pork Belly with Salted Dried Vegetable.

    So what is this Preserved Vegetable? In Mandarin, it is called 梅菜。 As the name suggested, vegetables (usually some kind of mustard) are salted and dried under the sun. As in most regions with cold winter weather, vegetables are pickled/preserved so that there is vegetable on the dinner table during winter times.


    Ingredients  (10 servings)

    One bunch of preserved vegetable (about 1 lb)
    Pork Belly (about 1.5 lb)
    Pork Butt/Pork Shoulder (about 1 lb)

                                                                    Preserved Vegetable


    Seasonings

    One whole garlic bulb
    Two thumb-size ginger
    half tablespoon salt
    3 tablespoons light soy sauce,
    3tablespoons dark soy sauce

    Instructions

    All of the work in making this dish are in the preparation

    Preparation:
    1. Cut the meat into small chunks and boiled in water for 10 minutes to remove the grim.
    2. Clean the preserved vegetable thoroughly and chopped into small pieces
    3. Clean and remove excess dry skin from the garlic (leave it as a whole bulb)
    4. Slice the ginger into thin slices

    Cooking:
    1. Combine the cooked pork, preserved vegetable and all the seasoning ingredients into a pot.
    2. Add just enough water to cover the top of the meat/vegetable.
    3. Turn the heat on high.
    4. Once it starts boiling, lower the heat and simmer for 1-1.5 hours. Or until the meat is fully tenderized.
    5. Seasoned with more salt if needed.


    Imagine you are sitting outside an old quaint cottage in the village with your partner when the sun is setting. You basked in the residual warmth of the sun and enjoy a bowl of rustic stew. That's the only way I can describe the feeling of eating this dish.


    If that's not pleasurable enough, treat yourself to a glass of homemade mint tea.