I am a scientist who loves to cook because there are many similarities between working in a lab and cooking in a kitchen. I love to share my cooking experience with you and to inspire others to cook.

Friday, January 27, 2012

Pasta with Homemade Tomatoe Sauce and Sweet Italian Sauage


I have been making this dish for years since I discovered the beauty of Sweet Italian Sausage. Sweet Italian sausage is available everywhere and it comes readily seasoned. I looked up wikipedia and found out that the unique flavor of sweet Italian sausage comes from the multitude of fennel seeds used. 


As usual, this is such a simple dish that requires only 3 main ingredients. If you minus the pasta, there are essentially only two ingredients. The other one being the tomatoes.

Pasta, sweet italian sausage, and tomatoes. It does not get any easier than this, folks!

Let's dive in.

Ingredients (4-5 servings):
4-5 Sweet Italian Sausage
4 large tomatoes or two boxes of small tomatoes. Roughly chopped into small pieces
Pasta


Seasonings: salt, pepper, butter, and Parmesan Reggiano cheese


Instructions:
1. Remove the sausage skin and combine the sausage meat.
2. Form the sausage meat into smaller patties.


3. Heat some oil in a pan and cook the sausage meat

        I am probably the only one in the world who makes pasta sauce in a wok and you will see why


                                                  There were a lot of meat to be cooked
 

4. Add the tomato and cook it with the sausage meat


5. Cover the pot and simmer it in medium heat until the tomatoes break down and juices are all out.


                                  My wok did not come with a cover so I had to improvised


                                           The tomatoes are starting to break down
 
                               Almost there. All the juices you see there are pure tomato juice


6. Add a big dollop of butter (nope, won't apologize for this). Season the sauce with salt and pepper.
7. Continue cooking until the sauce thickens to your desired consistency. Not too thick, not to liquidy.
8. Cook some pasta and pour the sauce over the cooked pasta. Add some shaved cheese and freshly ground pepper.


It is hard to screw up this dish because there are so few ingredients and steps. It is also one of those fantastic dishes where you can cook a lot of the sauce in advance and store it for a few days or freeze it for longer storage.

Since the Italian sweet sausage came already well-seasoned, there isn't much seasoning left to do except salt and pepper. The tomatoes with its sweetness, tangy-ness, and freshness are flavorful enough and there is no need to mess with the sauce any further.

I will eat this pasta anytime of the day and anytime of the week. It is so simple to make and did I say DELICIOUS?

For more variations, you can definitely add frozen green peas, mushrooms (yummy), or carrots 


Monday, January 23, 2012

Homestyle Pork Chop


This is my ultimate "mom's dish". It is easy to prepare, easy to cook and delicious. If you have been following my blog, you would notice that I am a big fan of dishes that require very few ingredients and very few steps. Except the occasional elaborate experimental dishes such as the Curry Puff or the Butterscotch Flan.

How easy is it to make this "mom's dish" pork chop? Follow along!

Ingredients (serves 4)
1 lb of lean pork shoulder/pork butt/肉眼 (if you shop at the chinese grocery store)
soy sauce
salt
pepper
Five Spice powder
corn starch
ginger (optional)

Instructions
1. Slice the pork into half an inch thick.
2. Use the back of the knife and pound the pork until it is flat.  (time to make some noises!!! A good way to release some stress and anger, make sure you follow precautionary steps)


                                               Pork chops after being pounded. Pardon my sloppy slicing


3. Transfer the pork into a container and marinate the pork with 3-4 tablespoon of soy sauce, 1 teaspoon of five spice powder, a pinch of salt and a pinch of pepper.
4. Marinate this for 1 hour at room temperature, or in the refrigerator for >1 hour. You can marinate it overnight too.
5. Take the pork out from the container and rub some freshly grated ginger over it (mom actually does not do this).


6. Pat the meat with generous amount of cornstarch to create a thick layer of coat.


7. Heat about 2 tablespoon of oil in a non-stick pan and transfer the meat to the pan when the oil is hot.
8. "Fry" each side of the pork at medium heat for about 5 minutes. Keep an eye on the amount of oil in the pan. Since cornstarch soaks up oil, it will be necessary to add a little more oil.
9. "Fry" the pork until the cornstarch turns golden brown and very slightly charred at some places.
10. It is time to serve.


                                        Battle of two pans! The non-stick pan is definitely the winner


                                        Not quite ready. Needs to be a little crispier than this


                                                                    until it becomes likes this


Non stick pan might win the cooking battle but stainless steel pan created the most delicious thing on earth. Scraps!!


Everytime I think about mom's food, I think about this dish. The outer layer of the pork is crispy and the meat inside is still succulent. This dish does not use as much oil as the traditional fried pork chop. You can serve this with a plain bowl of rice like I did, or pasta or between two slices of bread, like a sandwich!

This pork chop definitely stores well in the refrigerator for a couple of days so you can make a few more pieces in advance.

What do you think of when you think about "mom's dish"?

Oh, one last thing. For extra crispiness, you can coat the pork with an EXTRA layer of panko bread crumbs!


Wednesday, January 18, 2012

Nothing to do with food

Here is a post that has nothing to do with food. I was first inspired by beautiful food photographs on other people's websites, as one friend puts it this way "It is like food-porn" (pardon the language) and she is right. A successful food photograph achieves one simple goal - you want to jump into the screen and consume it (no analogy intended).

My first step towards taking good food photographs came with the purchased of the T2i. My second step, thanks to SL, was the purchased of an interestingly shaped bowl. Then I learned how to use Lightroom photograph processing software.

After looking at photographs upon photographs upon photographs of food, I am starting to build a list of commonality between those food photography.

1) unique background surface, usually wood surface
2) simple, accented napkins
3) utensils, bowls, plates of all kinds/materials/shapes/colors
4) garnish, raw materials (ie: slices of apples/vanilla beans),
5) I am not certain about this but many of these photographers use extensive equipments such as monolight, softbox, tripods, and reflectors. 
6) others.

Tuesday, January 17, 2012

Seaweed Tofu Soup


Here is a soup that has been brewing in my mind before the real brew begins but I have never gotten around making it since I have a list of other soups to make. Then one day, as my pantry was being cleaned (thanks SL), I saw all these dried seaweed and I thought to myself that I must make use of it.

I also bought a pressure cooker recently. I have always wanted to cook with a pressure cooker since I was 7 years old. It was always one of those things that they sell on "As Seen on TV" (same is true with knives "Look, this knife slices through tomatoes perfectly and thinly!!" or this "I can ran this knife over and over again against this rock and the knife is still sharp", proceeds to slice bread).

I digress. Back to pressure cooker.

I always wanted to give this a try because I can reduce cooking time from 3 hours to 30 minutes. Who does not want to save time on cooking? So I bought one to try it out and the first thing I cooked with the pressure cooker is, you guessed it

Seaweed Tofu soup!


Ingredients (make 6 servings)

3 large pieces of dried seaweed. Break into small pieces and wash many times.
1 pack of tofu. Either soft tofu or firm tofu. Cut into small pieces
1/2lb of pork ribs
2 pieces of dried scallops (optional)
1 thumb size ginger (optional)


                           Scallop surfing on a piece of dirty seaweed that needs some major scrubbing


Instructions (same instructions if you do not have a pressure cooker)


1. Boil a medium pot of water and cook the pork ribs until the scum floats to the top of the pot
2. Pour the water away, save the bones, and add 6-8 cups of water back to the pot with pork.
3. Bring the water to boil again.
4. Add the dried scallops, ginger, cleaned dried seaweed, and tofu
5. Cook in medium heat for 1.5 hours. (if you use a pressure cooker, just follow the manufacturer's instructions)
6. Once the soup is done cooking, season with salt.


                                                            A harmony of flavors


My previous soup, which is the leek and potato soup took 30 minutes to prep; this soup took a little under 5 minutes to prep. The leek and potato soup was loaded with butter and cream, this soup is as pure and clean tasting as it gets.

I tasted the soup before I added salt and it was "alright", but once I added some salt, I literally said "OMG, this is freaking good" (repeated 2-3 times). I love the taste of sea from the seaweed and scallops. It almost felt like I am seating by the ocean and drinking fresh coconut juice from a coconut that just fell off the tree (sorry, bad analogy but you get the point). I undercooked the seaweed because I didn't time my pressure cooking time correctly. So make sure you taste the seaweed to ensure that it is soft. It might also be a good idea to break the seaweed to smaller pieces. Unlike me, I got lazy in breaking seaweed. 


Tuesday, January 10, 2012

Kale

http://vegonline.org/Vegetable-Nutrition-Facts/Nutrition-Facts-Kale.html


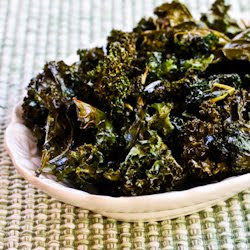
I never had kale before until you made kale chips one day. It was delicious. You might wonder what is kale chips. My same thoughts. I thought it was fried kale, you know, like potato chips. The kale chips that I had was more like roasted kale. I think it was made by sprinkling kale with salt and drizzle with oil followed by roasting. The end result was crispy crunchy kale chips. If you had one of those dried seaweed snacks before, the taste is almost identical as kale chips.


http://www.kalynskitchen.com/2010/03/recipe-for-roasted-kale-chips-with-sea.html


I didn't know Kale chip was such a big deal until I visited whole foods and saw an entire section of aisle selling nothing but kale chip. These companies take it one step further  http://www.kaiafoods.com/store/home.php?cat=8   or this   http://rhythmsuperfoods.com/


Cheesy kale chips, BBQ kale chips, sea salt kale chips

                             http://store.veganessentials.com/kaia-foods-raw-kale-chips-p3081.aspx


I saw some kale at the grocery store the other day and I just have to buy it to see what the hype is all about.  My cooking strategy is simple -- garlic stir fry.


Ingrediants:

A few cloves of garlic
Kale - roughly chopped into sections


Instructions:

1. Heat some oil in a pan.
2. Add the garlic and cook until golden brown.
3. Add the kale and cook until the kale is "wilted". (how do you describe the doneness of vegetable?)
4. Drizzle with some sesame oil, season with salt.


Now the verdict. Kale is quite fibrous and it definitely requires slightly more effort on the jaw to complete break it down in the mouth. Maybe this is why kale chips/toasted kale was invented. High heat roasting (instead of quick stir fry) turns the kale into a crunchier substance which is easier on the teeth. And taste?  I am not good at describing the taste of vegetable but the closest thing I can say is that kale taste like seaweed. Not ocean flavor but the earthy flavor. 


Monday, January 2, 2012

Curry Puffs

Oyster-looking-Curry Puffs


Man do I love eating curry puffs!! In my opinion, this is the ultimate finger snacks when done right. Almost every culture cuisine has something similar. Indians have samosa, mexicans have empanadas, and italians have calzones (poor comparison). For years, the only thing that comes close to the flavor of the Curry Puff is the Indian samosa since these two items are essentially the same thing but named differently.

I have been wanting to make curry puffs for a long time. Instead of making my own dough, I have decided to use store bought puff pastry. As for the fillings, I decided to follow the recipe on www.Rasamalaysia.com and, as usual, with my own slight variations. Please visit this site for the original recipe  http://rasamalaysia.com/recipe-curry-puff/2/

The original recipe and what most traditional curry puff have and probably the only difference between a samosa and a curry puff is this -- there is meat in curry puff, normally chicken. But mine is meatless since I didn't have any chicken readily available when I made this.


Main Ingredients for the Fillings

3 medium size potatoes (boiled, peeled and diced)
1 red onion (finely diced)
frozen green peas

Fillings Seasonings


1/2 tsp curry powder

1 tsp chilli powder
1/2 tsp turmeric powder
1 1/2 tsp sugar
1/2 tsp black pepper
1/2 tsp salt

Pastry

Puff pastry from any grocery store. Follow the manufacturing instructions when using a puff pastry.


Instructions

A) Fillings
1. Heat some oil in a pan.
2. Saute the onions until it turns golden brown.
3. Add the spice powders and fry gently. (Before adding the spice powder, make sure you have sufficient oil in the pan as the dry powder absorbs oil very quickly and might burn).
4.  Add the diced potatoes and green peas into the pan and fry gently. Season with salt and pepper.
Some notes:
a) It is okay to add additional seasoning such as curry powder, chilli powder, salt and pepper until you get something you like.
b) It is also okay to keep adding oil into the pan when things seems a little dry.
c) In the end, your potatoes might look more like a mash potato and this is okay too.
5. Let the potato filling cool down to room temperature (you must do this to ensure that the puff pastry works later).


I used an inverted Pyrex dish and run a sharp knife around it to cut out a circular dough


B) Pastry

1. Heat the oven to 400F for at least 15-20 minutes.
2. Thaw the puff pastry at room temperature according to the manufacturer's instructions.
3. Gently flour the table surface
4. Roll the puff pastry until it becomes thinner.
5. I ran a sharp knife around the edges of an upside-down bowl to cut out a round piece of dough.
6. Put some of the fillings on the cut-out dough and close the dough.
7. Use a fork to pinch the edges of the dough to crimp the edges.
8. Bake the curry puff according to the puff pastry's manufacturing instructions or, in my case in a purely empirical method, until the puff pastry is deemed sufficiently puff and the color turned golden brown.
9. Serve and enjoy!


Curry Puffs face off!!  


We tried out two different crimping method. The easier one is the one to left which was done using a fork


I have never work with puff pastry before until today. I love the smell of the butter coming out from the oven. That's when you know something is going right! However, my pastry did not puff up the way I want. Maybe I was expecting something to look like this, which was an unrealistic expectation:


Even though my pastry did not puff up, I was still very satisfied with this project. The curry flavored-potato balanced the sweetness of the butter aroma.


There are a few things that I learned from this experience and I will list them down with no order of importance:
a) Timing is everything. You want to work very fast with the puff pastry before the butter in the dough melts
b) Temperature is everything too. The oven needs to be very hot and ready to go. The fillings needs to be cooled and the working surface for the puff pastry should preferably be cold.
c) If you are using a puff pastry, do not add too much fillings because your curry puff will look like an oyster when the puff pastry puff up.